Breeze’s massive sprawl demands smart surveillance, and Cypher is your answer! With the map’s recent rework invalidating old trap positions, mastering updated setups separates good sentinels from game-changing intel wizards. Whether you’re holding B-site solo or watching flanks on attack, these refined Cypher placements will transform you into the surveillance maestro your team desperately needs.
Table of Contents
Essential Cypher Setup Overview
| Site | Primary Focus | Key Positions | Best Camera Spot |
|---|---|---|---|
| A-Site Defense | Multi-entry coverage | Right side walls, A-Hall watch | Big pipes at left pyramid |
| B-Site Defense | Main entrance control | Right side positioning, Mid Nest watch | High wall near B-Main entrance |
| Attack Setup | Flank detection | A-Shop door, Mid Hall coverage | Flexible post-plant positions |
| Post-Plant | Site lockdown | Default plant traps, cage combos | Retake denial spots |
B-Site Defense: Right Side Dominance
B-site remains Cypher’s strongest defensive position on reworked Breeze. Focus your utility on the right side for maximum impact while maintaining flexibility.
Trapwire #1 (B-Main Direct Block): Place this wire on the right side of the ladder between the second and third steps. This blocks the entire right entrance from B-Main rushes.
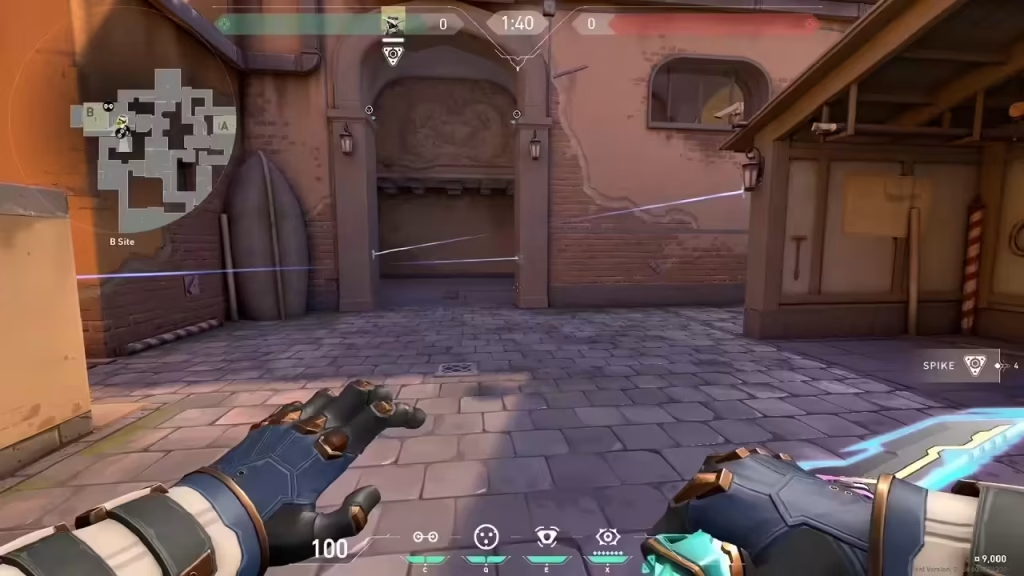
Trapwire #2 (Inner Site Coverage): Connect wires starting from the central stone, looking between textured bricks slightly lower. This catches enemies pushing deeper into the site after clearing your first trap.
Cyber Cage Strategy: Unfortunately, right-side positioning limits cage placement options. Use one cage as a one-way smoke at B-Back lane where you’ll defend most rounds, and save the second for reactive plays based on enemy positioning.
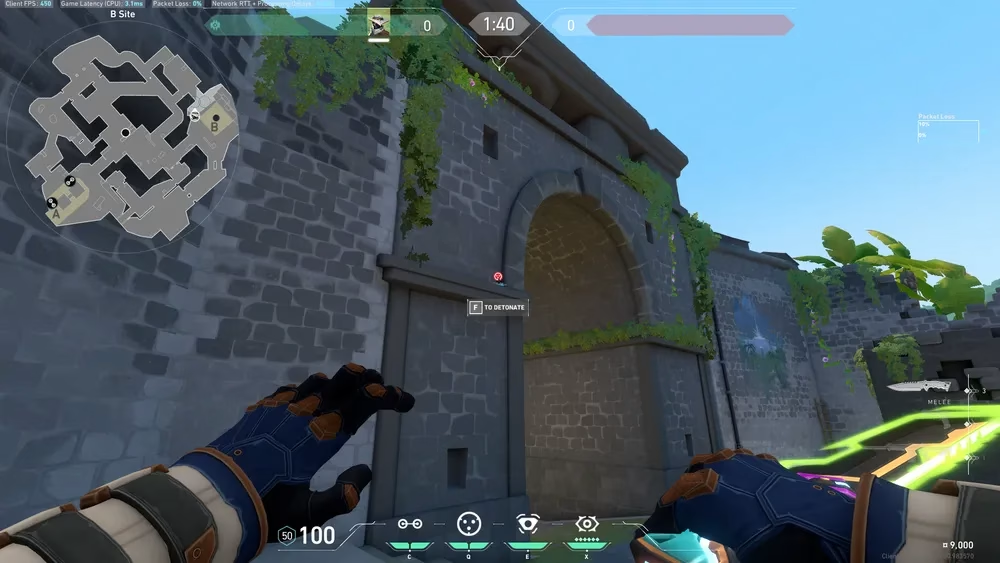
Spycam Placement: Stand on the high wall near B-Main and B-Back entrance. Aim at the inward wall section, jump, and shoot your camera. This position reveals both B-Tunnel approaches and Mid Nest rotations—critical intel your team needs.
For more tactical FPS strategies and agent-specific guides, check our Valorant competitive tips and sentinel mastery guides.
A-Site Defense: Multi-Angle Coverage
A-site presents more entry points (A-Cave, Mid Doors, A-Hall), requiring strategic trap distribution.
Primary Camera (Best Position): Stand on high ground near the left pyramid’s big pipes. Jump and spam left-click to place your camera. The pipes provide natural concealment while offering complete site vision plus Mid Doors coverage.
A-Main Entrance Traps: If enemies don’t use damaging abilities at A-Main entrance, place your first trap at the rock beside the barrier (positioned low), and your second trap at the double box on the right covering the cave entrance.
A-Hall Flank Trap: A simple but effective trap catches lurkers coming from A-Hall above. Position this to backstab alert your team during site holds.
Default Plant Counter: For post-plant scenarios, place a trap under the fence where the platform rises, connecting it to the pyramid. Combine this with your cyber cage for devastating one-way duels.
Attack Setup: Flank Watch Priority
Unlike defense, Cypher’s attacking role focuses on preventing backstabs and providing temporary smokes.
A-Shop Flank Detection: With Breeze’s new update adding Mid Hall direct access to A-Shop, place one Trapwire monitoring the automatic door. The door’s noise alert already warns you, so save your second wire for flexible site placements.
Post-Plant Positions: Reuse any defensive trap positions shown above depending on where you plant. The beauty of Cypher’s kit is versatility—adapt your utility to match spike location and expected enemy retake routes.
Cage Usage: Don’t waste cages early. Use them as temporary smokes helping your duelists enter sites, then save remaining charges for post-plant denial.
Pro Tips for Breeze Cypher Mastery
Buyback Your Utility: During buy phase, retrieve incorrectly thrown cages and repositions them before round start. Once the round begins, you can only activate—not retrieve—utility.
Stay Alive Longer: As a sentinel, you should be last alive on site in most scenarios. Prioritize hiding spots over aggressive peeks, especially at mid or exposed angles. Your value comes from information and delayed pushes, not early duels.
Combo Your Kit: The most effective Cypher plays combine abilities. Pair Trapwires with Cyber Cages for one-sided duels where you see enemies who don’t know your position. This setup turns raw intel into confirmed kills.
Adapt to Meta: The right-side B-site focus works because most teams push B-Main predictably. If enemies start favoring Mid attacks or A-site executes, shift your default positioning and utility placement accordingly.
Visit the official Valorant Agents page for ability details and updates to Cypher’s kit.
Map-Specific Challenges
Breeze’s size creates unique Cypher challenges compared to compact maps like Split or Bind. The open sightlines favor Operators and long-range duels, meaning your Trapwires face easier destruction. Counter this by:
- Placing wires in shadowy corners or behind obstacles
- Using cage activations to obscure enemy vision before they spot wires
- Repositioning camera frequently to avoid pattern recognition
Remember that flanking is standard on Breeze due to its vastness. Always maintain at least one Trapwire watching rotations even when full-committing to site defense.
FAQs
Q: Should I play Cypher or Killjoy on Breeze?
Cypher edges out Killjoy on Breeze due to superior range coverage and more flexible trap positioning across the massive map. Killjoy’s limited turret range struggles with Breeze’s sprawl, while Cypher’s global camera and extended Trapwires excel.
Q: How do I counter enemy teams who destroy my Trapwires immediately?
Position wires in unexpected angles (like the ladder step placement) rather than obvious chokepoints. Combine wires with immediate cage activation upon trigger to obscure enemy vision, forcing them to choose between pushing blind or retreating.